Written and reviewed by A Pomsky Editorial Team. Originally published 2023-07-06; substantively reviewed July 26, 2026.
Training boundary: Use humane, reward-based methods and protect safety with management. Pain, panic, aggression, a bite history, or serious handling risk requires a veterinarian or qualified behavior professional. Read the editorial policy.
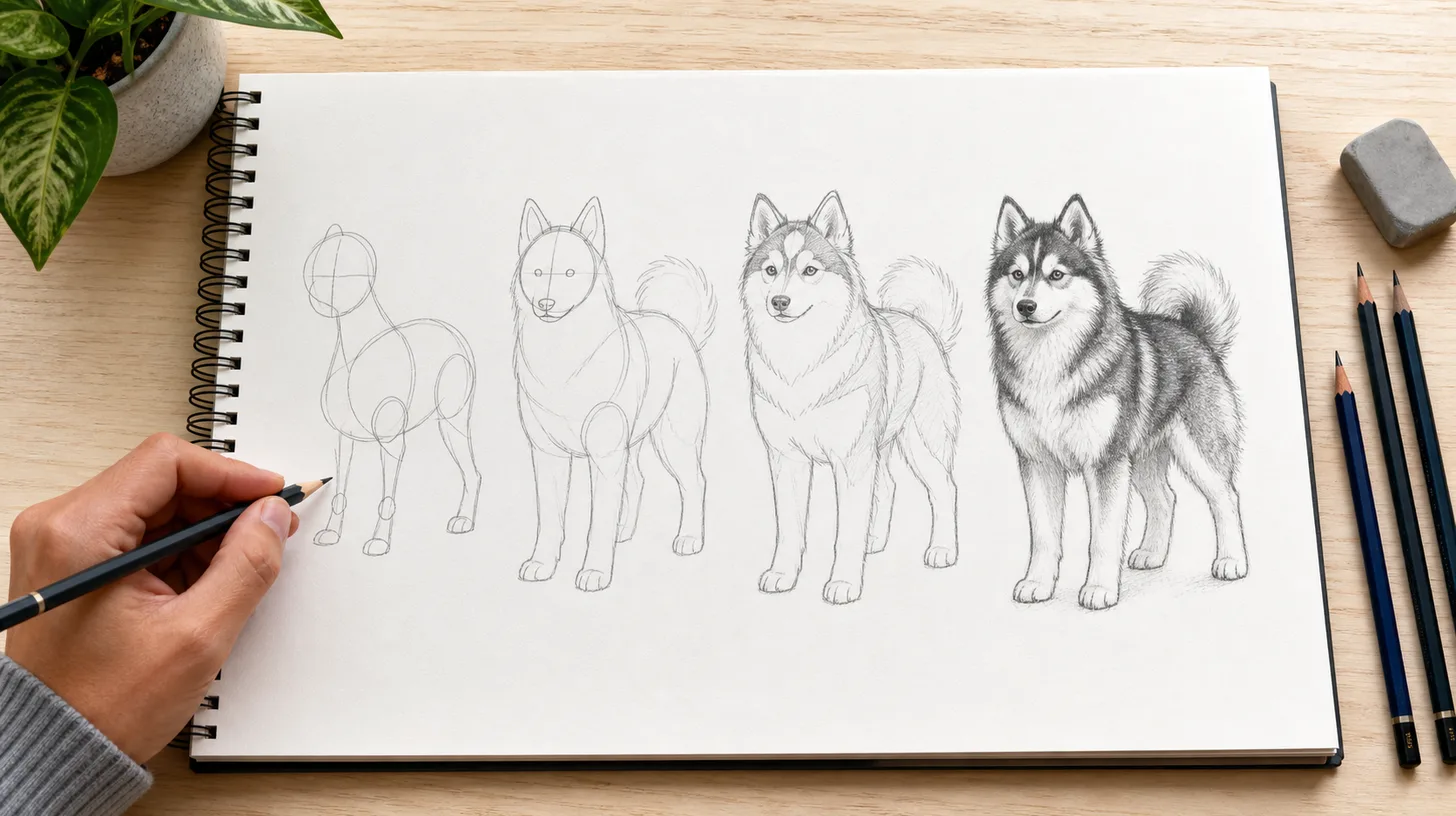
Direct answer: Draw a Pomsky in four passes: block the pose with simple shapes, refine the body and head structure, map the facial mask and coat volume, then add controlled shading and fur direction. Use a permitted photo of the individual dog because Pomskies vary widely.
Draw a Pomsky by building the pose from simple shapes, checking the body proportions, refining the pointed ears and tapered muzzle, then adding the facial mask, double-coat texture, and curled or plume-like tail. Keep the construction lines light and use a real reference of the individual dog because Pomskies do not share one standardized appearance.
This beginner method uses four passes: gesture, structure, features, and coat. Finish one pass across the whole dog before adding detail.
Choose a clear reference and pose
Use a well-lit photo that you own or have permission to use. A three-quarter standing pose shows the head, chest, back, legs, and tail without extreme perspective. Avoid beginning with a blurry image, a heavily foreshortened selfie, or a dog hidden by furniture.
Crop the reference so the dog fills most of the frame. Identify the head angle, spine direction, weight-bearing legs, and outer silhouette. Do not start by drawing individual hairs.
Pomskies vary because they are mixes rather than an AKC-recognized breed with one conformation standard. Parent-breed references can help you notice possible traits, but they should not force the drawing into one template. Compare the AKC Pomeranian profile and Siberian Husky profile only as visual context.
Prepare plain paper, an HB or 2H pencil for construction, a softer pencil for dark values, an eraser, and a ruler if proportions are difficult. Digital artists can use separate layers for the same four passes.
Block the gesture with simple shapes
Draw a light line for the spine from the shoulders toward the base of the tail. Add an oval for the rib cage and a smaller mass for the pelvis. Connect them with the abdomen line.
Place a circle or rounded wedge for the skull. Add a short center line that follows the head turn, then a small muzzle block. Two triangles mark the ears, but keep them flexible until the head angle is correct.
Use single lines for the front and rear legs. Mark shoulder, elbow, wrist, hip, knee, and hock with small points. Draw a ground line so the paws share a believable surface.
At this stage, ask:
- Is the head too large for the body?
- Does the spine show the intended pose?
- Are the legs carrying weight in plausible positions?
- Is the chest deep enough without becoming a barrel?
- Does the tail start from the pelvis rather than the middle of the back?
The AKC geometric-shape drawing lesson uses shapes and lines as a construction exercise. The same principle works for a full-body sketch: shapes organize proportion before detail.
Refine body and leg structure
Turn the rib-cage and pelvis masses into an outer contour. Connect the neck from behind the skull to the shoulders and from the jaw to the chest. Keep the coat separate from the underlying body in your mind.
Build each leg around its center line. Front legs descend from the shoulder and upper arm into the forearm; rear legs include the thigh, hock, and paw. Avoid four identical straight columns. Use the reference to see which joints bend and which legs overlap.
Draw paws as low wedge shapes before adding toes. Check that weight-bearing paws sit flat on the ground line. A lifted paw should show a clear reason in the pose.
Sketch the tail as a flowing center line with thickness around it. Some Pomskies carry a curved or curled tail, while others show a looser plume. Copy the reference rather than adding a perfect circle automatically.
Flip the page in a mirror or reverse the digital canvas. Proportion errors become easier to see. Correct the large shapes while lines are still light.
Construct the Pomsky head
Use the center line to place the eyes on the turned skull. The farther eye appears narrower in a three-quarter view. Position both eyes before darkening either one.
Build the muzzle as a tapered form that projects from the face. Place the nose at its end, not flat between the eyes. Add the mouth line beneath the muzzle and keep the jaw light.
Set the pointed ears into the top and sides of the skull. Their bases have width; they are not thin triangles pasted on the outline. Use the reference for tilt and asymmetry.
Place the nose, eye corners, and ear bases using comparative distances. For example, compare muzzle length with skull length and the space between the eyes with one eye's width. These are drawing checks, not breed measurements.
Add the facial mask only after the features align. Mark color boundaries lightly around the forehead, eyes, cheeks, and muzzle. Each dog has an individual pattern, and a symmetrical mask should not be invented when the reference is uneven.
Add double-coat volume and markings
The coat changes the silhouette around the cheeks, neck, chest, back of the legs, and tail. Draw groups of fur, not thousands of equal lines. Use short directional strokes on the face and legs and longer grouped strokes on the ruff and tail.
Leave breaks in the outer contour. A perfectly continuous dark outline can make soft fur look like plastic. Let some tufts overlap the body edge while preserving the underlying anatomy.
Map three large value groups before shading: light coat, middle-value coat, and darkest markings. Squint at the reference to simplify. Keep highlights in the eyes and nose small and controlled.
For a gray-and-white dog, use the paper as the lightest value and shade the gray areas gradually. For black-and-white markings, reserve the darkest pencil for a few focal areas so the face does not become a flat black patch.
Follow fur direction around forms. Cheek fur radiates away from the muzzle, chest fur descends and fans, leg fur follows the limb, and tail fur flows along the curve. Direction creates volume more effectively than random texture.
Shade for depth without losing the pattern
Choose one main light direction from the reference. Shade beneath the chin, inside the far ear, under the chest, between overlapping legs, and beneath the body. Add a cast shadow on the ground to anchor the dog.
Use softer edges in fur and sharper edges around the eyes, nose, and selected overlaps. Not every boundary deserves the same contrast. The viewer's attention usually goes to the face, so preserve the clearest detail there.
Layer graphite rather than pressing hard immediately. Build middle values, lift highlights with a kneaded eraser, then add the darkest accents. Excessive smudging can erase fur direction and make the coat muddy.
Step back from the page. Check whether the dog reads as a complete pose before zooming into whiskers or individual hairs. If the head looks convincing but the legs do not support the body, return to structure.
Fix common Pomsky drawing problems
A fox-like face often comes from a muzzle that is too narrow or eyes placed too high. Recheck the skull and muzzle blocks. A bear-like face can result from a muzzle that is too short and a round outline without cheek structure.
Oversized ears can dominate the head. Compare each ear's height with the skull rather than drawing from memory. A tail that appears attached to the spine usually needs its base moved down toward the pelvis.
If the coat makes the dog look shapeless, redraw the rib cage and legs lightly underneath. Fur volume should wrap around structure, not replace it.
Do not copy a copyrighted character, another artist's finished drawing, or a stock image without permission. Use your own dog photo, a licensed reference, or a source that clearly permits the intended use.
Avoid trying to make every Pomsky match one ideal. The site's pages on Pomsky coat types, Pomsky coat colors, and adult Pomsky size show why individual references matter.
Finish and practice with variations
Erase only construction lines that distract from the finished drawing. Preserve a few light lines if they support the form. Add whiskers and stray hairs selectively, sign the work, and photograph or scan it in even light.
Repeat the four-pass method with a seated pose, a front-facing head study, and a curled sleeping pose. Change one challenge at a time. A series of short studies develops proportion faster than endlessly polishing one first attempt.
For a useful practice sheet, draw the same reference four times: gesture only, structure without fur, head and markings, then a complete shaded version. Compare where each pass improved or distorted the pose.
The finished drawing does not need to look like every Pomsky. It needs to look like the individual dog in the reference. Simple construction, accurate observation, and controlled coat texture are the reliable path from blank page to recognizable portrait.
Sources reviewed
Each source is used only for the claim scopes listed below. None establishes a guaranteed Pomsky outcome or replaces individual professional assessment.
- American Kennel Club: Drawing a Dog Face With Geometric Shapes and Lines - Supports: construction shapes; line practice; reference comparison. Limit: The exercise is practice, not an anatomical or breed-standard certification.
- American Kennel Club: Pomeranian Dog Breed Information - Supports: Pomeranian size range; Pomeranian coat; Pomeranian temperament tendencies. Limit: Parent-breed context only; not direct Pomsky outcome evidence.
- American Kennel Club: Siberian Husky Dog Breed Information - Supports: Siberian Husky size range; Siberian Husky coat; Siberian Husky temperament tendencies. Limit: Parent-breed context only; not direct Pomsky outcome evidence.